Esfiha de Folhas de Couve-Flor
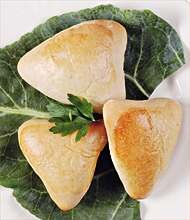
RENDIMENTO: 15 esfihas
VALOR CAL?RICO POR POR??O: 511,31 cal
TEMPO DE PREPARO: 1 hora e meia
MASSA:
1 1/2 colher de sopa de fermento biol?gico
2 colheres de sopa de a??car
Dissolva o fermento no a??car.
1 x?c. de ch? de ?gua morna
5 colheres de sopa de ?leo
1/2 colher de sopa de sal
4 x?c. de ch? de farinha de trigo
Junte a ?gua morna, o ?leo, o sal e a farinha aos poucos, at? a massa soltar das m?os e formar bolhas.
Cubra e deixe descansar por 30 minutos.
Abra a massa em c?rculos com aproximadamente 15 cm.
RECHEIO:
1 1/2 x?c. de ch? de cebola picada
2 colheres de sopa de azeite de oliva
Refogue a cebola no azeite.
3 x?c. de ch? de folha de couve-flor
sal
Acrescente as folhas de couve-flor picadas e o sal.
6 azeitonas verdes
Por ?ltimo, junte as azeitonas picadas, misture bem e desligue o fogo.
PREPARO:
1 gema
Coloque o recheio na massa aberta.
Feche a massa em forma de esfiha, pincele com a gema batida e leve para assar em assadeira untada e enfarinhada, em forno preaquecido, at? dourar.
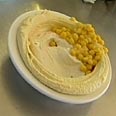
Hummus

 1/2 pound of dry garbanzo beans, soaked overnight
Tahini (sesame paste)
3-4 cloves of fresh garlic
1 pepperocini and brine from jar
Juice of 1 lemon Juice
Spices: cumin, corriander, salt, chilis, etc. to taste
First you take the garbanzo beans and soak them overnight. Then boil them for about 35–40 minutes until soft; strain them and put aside. If you want you can also buy them in a jar or can from the supermarket—just don't tell anyone!
 In a food processor or blender add about 1oz of water (a splash) and all the remaining ingredients, pur?eing them until they make a thick Tahini paste. Put a couple of tablespoons aside to use for plating at the end.
Then I add the garbanzo beans to the mix and pur?e again. You just have to taste to see if it's right, and if it's too thick add more water, pepperocini brine, or lemon juice. [Moti Zadik — "It's sooo good!" - Watch it!]
MoTV: How to Make Hummus

Humus Israeli Video Funny
 middleeast spread
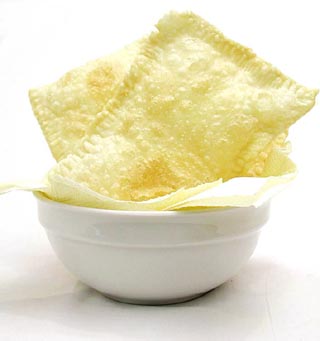
Pita
 400 g de farinha de trigo
20 g de a??car
20 g de manteiga
1 colher (ch?) de sal
250 ml de ?gua morna
1 tablete de fermento biol?gico
1. Dissolva o fermento na ?gua morna. Em seguida, adicione os demais ingredientes e sove bem, at? a massa se soltar das m?os.
2. Cubra a massa com filme pl?stico e deixe descansar at? triplicar o volume.
3. Divida a massa em tamanhos que convier. Abra a massa em discos e coloque-os para assar no forno a uma temperatura de 180?C, por aproximadamente 15 minutos ou at? dourar.

Until I made pita, I had assumed that there was some arcane magic involved in creating the pocket. My mind created thoughts of special folding techniques, making cuts half-way through baking and so forth. I'm happy to report, that you need do nothing but make sure your baking sheet is piping hot at all times.
The dough begins cooking immediately that you place it on the hot baking sheet, and the rapid rising in the oven--oven spring--tears the gluten, thus creating the pocket. When I say rapid, I really mean it. The dough blew up like a puffer-fish in the oven and the finished pita wobbled happily on their bases when I drew the sheet out after three minutes.
If you intend to squash the pita flat for easy storage then I suggest that you do it quickly, otherwise the cooling crust will prevent some of the air from being expelled. However, if you plan to stuff the pita with kebab, salad, or even peperonata and chicken, then it is not necessary to squash the breads.
Pita Bread
Makes 12.
300ml tepid water
1 1/2 tablespoons extra-virgin olive oil
approx 500g bread flour
7g sachet easy-bake/instant yeast
2 teaspoons sea salt
pinch or two of ground cumin
Place the water and olive oil in a large bowl. In a separate bowl, mix the flour and the yeast.
Add one handful of the flour mixture to the oil-water. Beat well. Continue to add flour by handful, adding the salt after four handfuls, until you have a soft but not sticky dough.
Turn the dough out onto a floured surface. Cover with the bowl and leave to rest for ten minutes. This allows the flour to complete hydration and makes the dough easier to knead.
Uncover, sprinkle with a few pinches of cumin (less than 1/2 teaspoon in total), and knead vigorously until smooth.
Return to the bowl, cover with clingfilm/wrap and leave to rise until doubled. About one hour.
Turn dough out onto a floured surface and punch down. Cover with the bowl, and leave to rest for 10 minutes.
Divide into 12 equal portions and recover. Place a heavy baking sheet in the oven and preheat to the highest temperature possible. Lay two tea/kitchen towels out and flour them thoroughly.
Working with one piece of dough at a time, knead a couple of times, then roll out into a thin oval, or round if you prefer. Place on the prepared towel and continue to shape the other pieces. Leave the shaped dough to rise for 30 minutes.
The pita will be baked in batches. Carefully remove the sheet from the oven and place the pita on it--I managed five pieces per sheet--and spray or splash them lightly with water.
Bake for 2 minutes. Check that the breads are not browning too much--they should remain pale--and continue to cook for another minute or so until they are firm.
Transfer to a wire rack and cool for five minutes, then wrap in a clean tea towel. This keeps the pita from forming a hard crust.
Eat as soon as possible, either warm from the oven or reheated in the toaster or under the grill. Can be frozen on the same day as baking and will remain good for one month.
*** Bread flour has a higher percentage of gluten (protein) than all-purpose or plain flour. You could substitute plain flour but you won't get such a good crumb.
*** The oven should be preheated to its maxiumum temperature as stated in the body of the recipe. [www.aspoonfulofsugar.net/]
 arab bread
Falafel
 1 kg de grão de bico
 coentro
cominho
coentro verde
hortelã
salsinha
cebolinha
sal
pimenta
cebola
alho
Obs: Todos estes temperos são a gosto, pois determinam o sabor mais forte ou não da receita (recomenda-se usar temperos frescos pois realçam o sabor)
2 ovos
1 colher de sopa de fermento em pó
Deixe o grão de bico na água 24 horas.
Escorra a água e bata os grãos com os temperos os ovos e o fermento no processador, até formar uma pasta grossa que seja fácil de enrolar em bolinhas de aproximadamente 5 cm de diâmetro.
Frite em óleo bem quente e sirva dentro do pão sírio com vinagrete, molho de pepino com iogurte e molho de tahine vendido em casas especializadas em comida árabe.

*** More recipes for actual falafel from scratch:
www.theepicentre.com
www.cooking.com


How to Use the Falafel Tool

2. Heat a generous amount of cooking oil in a saucepan. Do not let it burn.
3. Hold the falafel tool in one hand and presse the spring button down with your thumb. Hold a wide-blade knife in the other hand and using the knife, pile the falafel mixture into the falafel tool, so that it is full. Smooth it out, then release the button so that the falafel mixture can fall into boiling oil. Work just above the pot, so that the balls gently slide into the oil. Continue until you have used up all of the falafel mixture.
4. Once the falafel balls are brown on one side, roll them over gently. When both sides are brown remove the balls and place them on absorbent paper that will absorb the excess oil.
5. Serve falafel balls with humus, rice or pasta.
 MiddleEast Snack
Bamba
 Bamba is the best-selling snack and the strongest children’s brand name in Israel.
Bamba was first produced with a cheesy flavor in 1963, but in 1964 it was changed to the familiar peanut flavor we know so well today. The change was made after the Osem marketing team set up a focus group of children from Holon, where the production plant is located. As far as we know, this is the first time that a consumer group in Israel has “dictated” manufacturing-related aspects of a product.
 Product Values
· Functional Values–a tasty, nutritious snack
· Emotional Values–the snack has become an integral part of Israeli culture; two generations of Israelis have grown up on Bamba.
The Bamba Baby
The Bamba Baby was first presented to the public in 1992, and since then has become the product image. The Bamba Baby appears in all advertising and media activities, and appears on some of the Bamba packaging. The packages with the Bamba Baby are directed at the children.
Corncake

1/2 cup flour
3/4 teaspoon salt
1/2 teaspoon freshly cracked black pepper
1 large egg
1/3 cup milk
In a bowl, combine flour, salt, pepper, egg and milk until just combined.
2 cups corn kernels
1/2 Vidalia onion, chopped finely
3 tablespoons chopped fresh Italian parsley
1 tablespoon chopped fresh chives
Fold in corn, onion, chives and parsley.
2 tablespoons vegetable oil (for frying)
Heat about 1 1/2 - 2 tablespoons vegetable oil in large skillet on medium heat.
Drop 1/4 cups of batter onto skillet (or more if you want bigger cakes).
Flatten slightly with spatula and cook until browned, about 4 minutes per side.
Repeat with remaining batter, keeping cooked cakes warm in oven until served.
Serve with maple syrup or hot sauce, depending on what they are accompanying.
Notes:
· Corn cakes are the perfect side dish to anything barbequed - these would be even better if you grilled the corn on the cob first, then removed it to use in the fritters...add a nice smoky flavour to them.
· These also could have used a bit of spice to them; perhaps some red pepper flakes or horseradish next time!
------------------
www.domesticgoddess.ca
Pastel
100 g de gordura vegetal
300 ml de ?gua
3 colheres (sopa) de pinga
1 colher (sopa) de sal
1 kg de farinha de trigo
1. Coloque cerca de 700 g de farinha num recipiente grande. Acrescente a gordura vegetal, o sal e misture at? obter uma farofa.
2. Acrescente a ?gua e a pinga aos poucos e v? trabalhando a massa. Acrescente todo o l?quido e se for preciso acrescente a farinha restante.
3. Embrulhe a massa em filme pl?stico, leve ? geladeira e deixe descansar por cerca de 2 horas.
4. Para abrir a massa, retire a por??o desejada, polvilhe bastante farinha sobre uma superf?cie lisa e limpa e abra a massa bem fina com um rolo. Se preferir, a massa pode ser aberta com um cilindro.
5. Coloque o recheio desejado, feche molhando as beiradas com ?gua para grudar bem.
6. Frite em ?leo quente e sirva imediatamente.
מתכונים על בסיס תירס

בעוד שכמעט כולנו אוכלים תירס כירק, מעט אנשים בארץ מנצלים אותו כקמח. מקמח תירס עשויים מאכלים כמו הפולנטה האיטלקי, הממליגה הרומנית, הלחם או מאפין התירס האמריקני והטורטיה המכסיקנית. אין להתבלבל בינו לבין עמילן תירס (קורנפלור), מוצר חסר ערך תזונתי (מלבד מקלוריות), המתאים להסמכת תבשילים.
מרובעי פולנטה, ריחן וצנוברים
מתאימים כמתאבן ל- 8-6 מנות. ניתן להכפיל את המתכון ולהכין כמנה עיקרית. אפשר, אם רוצים, להגיש עם סלסה מוכנה. חברתי מיה, ממוצא רומני, מכינה את המתכון בלי הסלסה, ויוצקת את הפולנטה (שהיא קוראת לה ממליגה) לקערות. את הממליגה היא אוכלת עם גבינה מלוחה.
החומרים (ל- 8-6 פרוסות):
1/3 כוס צנוברים קלויים במחבת יבשה
8-6 עלי ריחן טריים, שטופים היטב
4 כוסות מים
1 כפית מלח
1 כוס פולנטה (קמח תירס)
2 כפות חמאה
שמן זית
לסלסה:
1 סלסלה עגבניות שרי אדומות ובשלות, חצויות
2 שיני שום כתושות
1/4 כוס כוסברה קצוצה גס
4 כפות שמן זית
מיץ מליים אחד או חצי לימו
קורט סוכר חום בהיר (דמררה או מו- סקבדו)
מלח ורוטב טבסקו או פלפל חריף לפי הטעם (אם רוצים)
אופן ההכנה:
הסלסה: לוחצים כדי להוציא את הגרעינים מחצאי העגבניות וחוצים לרבעים. מערבבים עם יתר החומרים ומעמידים בצד, בטמפרטורת החדר, לפחות שעה לפני השימוש. ניתן לאחסן במקרר.
הפולנטה: שוטפים היטב את עלי הריחן, מייבשים, אך לא מקצצים כדי שלא ישחימו.
בסיר גדול מרתיחים מים ומוסיפים את המלח. מוסיפים את הפולנטה באיטיות, בבחישה מתמדת עם כף עץ. מנמיכים את החום ומבשלים תוך בחישה לעיתים קרובות עד שכף העץ עומדת באמצע התערובת, והתערובת נפרדת מדפנות הסיר.
מוסיפים את החמאה והצנוברים. חותכים את הריחן לרצועות דקות ומוסיפים. משטיחים את הפולנטה בתבנית עגולה ומשומנת בקוטר 20 ס"מ (כמו תבנית לפאי) ומצננים לפחות שעה.
פורסים את הפולנטה בתוך התבנית למשולשים, כמו פאי, ומברישים בשמן זית (בלי להוציא מהתבנית). אופים בתנור בחום בינוני (180 מעלות) עד שהפולנטה מוצקה מלמעלה ומזהיבה (אפשר להכניס לקראת הסוף לדקה-שתיים מתחת לגריל). מגישים כשהסלסה בצד.
------------------
Ynet - מתכונים על בסיס תירס
Flavored Butter
Flavored butter, also referred to as compound butter, is prepared by blending together various ingredients such as fresh herbs, shallots, minced garlic, chili powder, pepper flakes, grated citrus zest, or an array of spices, fruits, and vegetables. It is commonly used as a condiment, as an addition to sauces, to baste meats and vegetables as they are grilled or broiled, and as a flavored topping for chops, steaks or seafood.
Flavored logs can be made by hand, with a blender, or by using a food processor. The following is a demonstration of how to make a flavored butter log by hand.
*** Butter logs are easy to store and are an attractive addition to any meal. Butter logs will remain fresh for up to one year when stored in the freezer.

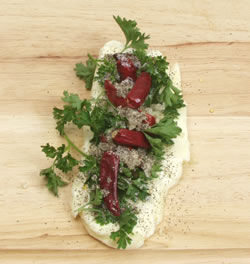
Roasted Red Pepper and Garlic Butter
1 cup (1 stick) unsalted butter, softened
½ tsp. salt
½ tsp. pepper
1-3 cloves minced garlic or 1 teaspoon garlic powder, adjust to taste
Fresh parsley, adjust to taste
Dried roasted red pepper, to taste (remove red pepper seeds)
Begin with unsalted butter that has been softened. With the heal of your hand, press the stick of butter onto a cutting board.

With a chef's knife, combine the recipe ingredients and butter together until they are completely blended together.


Place the blended butter on a sheet of waxed paper. Fold one edge of the waxed paper over the butter and wrap it under the butter.


Smooth the butter into a log. Once the butter is shaped into a log, roll the log up in the waxed paper.
Seal the butter roll by twisting the ends of the waxed paper in opposite directions.
Chill the butter in the freezer for a minimum of one hour. Once chilled, the butter can be sliced into attractive disks. If using at a later date, wrap the butter log in foil before storing in the freezer.

Creative Recipe Ideas
Simply Classic Herb Butter
1 cup butter, softened
Black pepper, to taste
Fresh parsley
Fresh tarragon
Fresh thyme
Lemon and Dill Butter
1 cup (1 stick) unsalted butter, softened
1½ tablespoons lemon juice
2 tablespoons grated lemon zest
Dill weed, to taste
Chili Butter
1 cup (1 stick) unsalted butter, softened
½ tsp. salt
¼ tsp. pepper
4-5 tsp. chili powder
1½ tsp. lime juice
1 tsp. pepper sauce
Strawberry Butter
1 cup (1 stick) butter, softened
1 tsp. lemon juice
1 tsp. sugar
Fresh, strawberries, to taste
(hulled and halved)
 butter how-to
Flavored logs can be made by hand, with a blender, or by using a food processor. The following is a demonstration of how to make a flavored butter log by hand.
*** Butter logs are easy to store and are an attractive addition to any meal. Butter logs will remain fresh for up to one year when stored in the freezer.


Roasted Red Pepper and Garlic Butter
1 cup (1 stick) unsalted butter, softened
½ tsp. salt
½ tsp. pepper
1-3 cloves minced garlic or 1 teaspoon garlic powder, adjust to taste
Fresh parsley, adjust to taste
Dried roasted red pepper, to taste (remove red pepper seeds)
Begin with unsalted butter that has been softened. With the heal of your hand, press the stick of butter onto a cutting board.

With a chef's knife, combine the recipe ingredients and butter together until they are completely blended together.


Place the blended butter on a sheet of waxed paper. Fold one edge of the waxed paper over the butter and wrap it under the butter.


Smooth the butter into a log. Once the butter is shaped into a log, roll the log up in the waxed paper.
Seal the butter roll by twisting the ends of the waxed paper in opposite directions.
Chill the butter in the freezer for a minimum of one hour. Once chilled, the butter can be sliced into attractive disks. If using at a later date, wrap the butter log in foil before storing in the freezer.

Creative Recipe Ideas
Simply Classic Herb Butter
1 cup butter, softened
Black pepper, to taste
Fresh parsley
Fresh tarragon
Fresh thyme
Lemon and Dill Butter
1 cup (1 stick) unsalted butter, softened
1½ tablespoons lemon juice
2 tablespoons grated lemon zest
Dill weed, to taste
Chili Butter
1 cup (1 stick) unsalted butter, softened
½ tsp. salt
¼ tsp. pepper
4-5 tsp. chili powder
1½ tsp. lime juice
1 tsp. pepper sauce
Strawberry Butter
1 cup (1 stick) butter, softened
1 tsp. lemon juice
1 tsp. sugar
Fresh, strawberries, to taste
(hulled and halved)
 butter how-to
Condiment Set
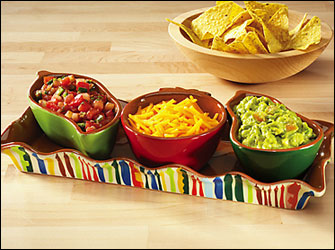
Enjoy a Mexican fiesta anytime with this handpainted terra-cotta tray and avocado, pepper, and tomato shaped 6 oz bowls. Fill the bowls with guacamole, pico de gallo, grated cheese, or spicy dips, and serve the tortilla chips from the tray.
Coconut Milk
 3 cocos frescos, ralados
½ l de ?gua de coco
Coloque o coco fresco ralado e a ?gua num liquidificador.
Bata em velocidade m?dia por 30 segundos.
Retire do liquidificador e coloque num recipiente com tampa.
Conserve em geladeira ou congelador.
From a Malaysian mother:
Grate the white flesh of a brown coconut using a cheese grater (the fine side will produce better results).
Add one cup of warm water to the grated coconut, put in a bowl and squeeze with your hands or put in a food processor and blitz.
Put results in a fine muslin cloth, twist into a ball and squeeze as hard as you can.
The first results are the thickest, called coconut cream.
The second and third cup of water you add and squeeze results in coconut milk which is thinner. [How to Make Coconut Milk]
 brazil fruit

